New updates for ACSM are released regularly! This page will run you through the steps to follow to update ACSM, whether hosted with emperorservers.com or self-hosted.
This page is for updating only, if you are installing ACSM from scratch please check our Installation Instructions.
¶ Installing a New Update
¶ Hosted With Emperor Servers
If you're hosted with Emperor Servers your server will automatically update itself to a new version if no event is running.
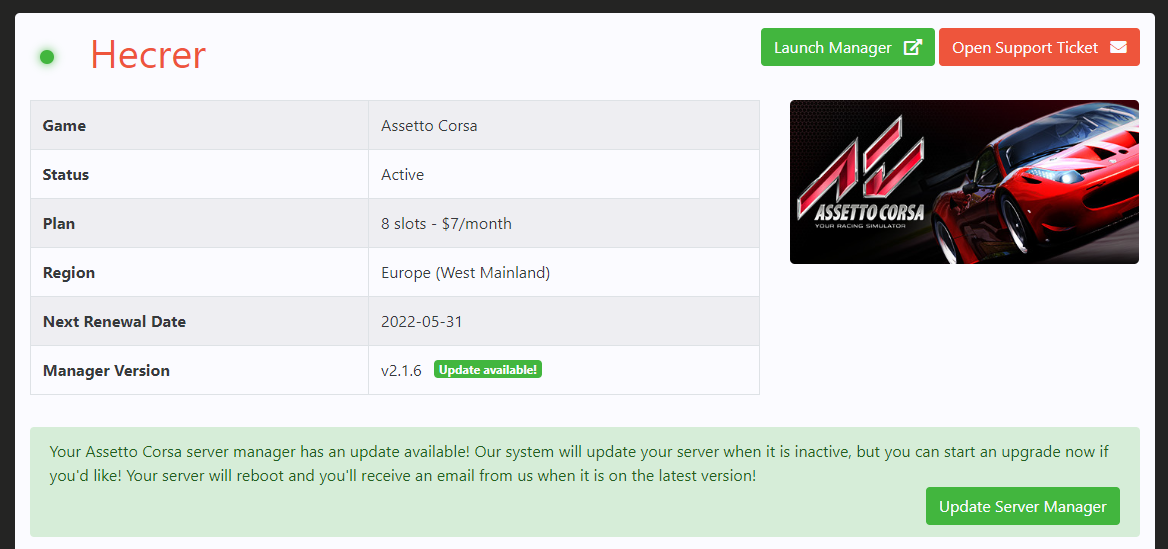
You can also manually trigger an update by logging in to your Emperor Servers Control Panel, clicking the "Manage Server" button next to the server you'd like to update, then clicking the "Update Server Manager" button, as seen below.

If you don't see the "Update available!" tag next to the version then your server is already up to date with your current update channel! If you don't see the "Update Server Manager" button then your server may be mid-way through updating or carrying out some other job, please wait a few minutes and then try again. If that still doesn't work contact us using the "Open Support Ticket" button.
¶ Update Channels
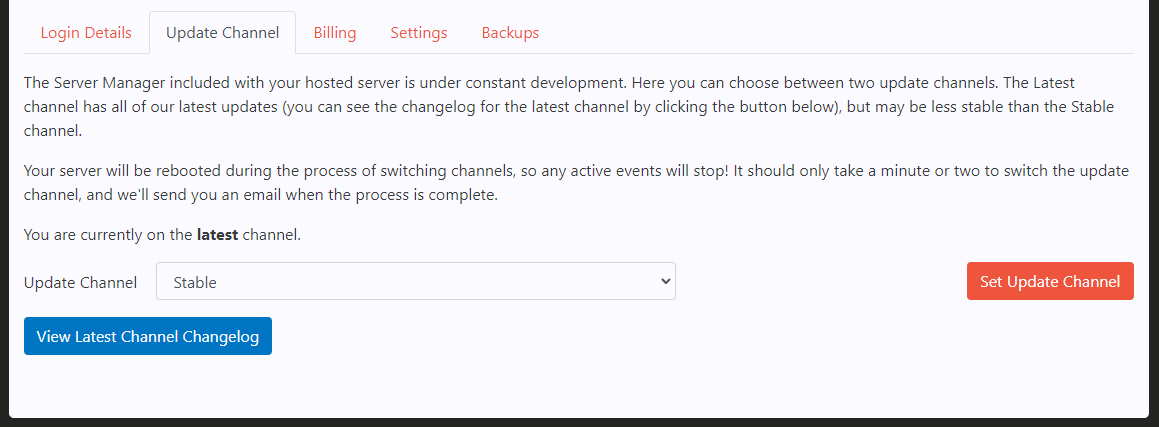
From the Emperor Servers Control Panel you can switch the Update Channel of any of your ACSM servers, just click the "Manage Server" button next to the server, then click the "Update Channel" tab.

There are currently two channels available, Stable and Latest. By default servers will be created on the latest channel, but the stable channel is available in case of the rare occurance of a new update causing an issue. You can switch channels by selecting the channel you would like from the dropdown, then clicking the "Set Update Channel" button. Switching channels will reboot your server, and automatically upgrade/downgrade it to the correct version for that update channel.
¶ Self Hosted
We recommend always making a full backup of your server whenever you install a new update!
Firstly, log in to your Emperor Servers Control Panel and use the download button to download the version you need.
Unpack the folder somewhere convientent using a tool such as 7zip and then follow the steps below.
¶ For a normal update
All you need to do is replace/override the two executable files in your old install and update your config.yml to add any new options that the new version added.
For Windows the two executable files are:
server-manager.exe
assetto-multiserver-manager.exe
The naming should be the same for Linux, MacOS, and ARM downloads.
If any new options have been added to config.yml then they will always be mentioned in the changelog, so it's always best to read the changelog before updating!
¶ If you're moving from a single server install to multiserver
Upgrading to multi-server is a little more complex, and you can only keep your existing store if you are using a json store for your single server install. However, it is possible to port across your results and championships in any setup.
- Extract the new version of manager folder to your preferred location.
- Navigate to the multiserver folder inside the extracted folder.
- Open
servers.yml. - Change the 'servers' number to how many Assetto Corsa servers you want and save.
- Copy
server-manager.exeandconfig.ymlinto the multiserver folder, alongsideservers.ymlandassetto-multiserver-manager.exe. - If you set the
install_pathto a value and you are not using steamcmd to install Assetto Corsa, make sure that the Assetto Corsa server is installed in that path. If you are using steamcmd, please make sure that steamcmd is in your system's PATH variable. - Run
assetto-multiserver-manager.exe! - If you're using a JSON store you now need to copy across your old store data. Look in the multiserver folder for
shared_store.jsonthen copy your old JSON store files into that directory. You should then see custom races, accounts, championships and race weekends from your old install on each of your multi-server instances. If you don't want to keep existing data skip this step. - If you're using a bolt store unfortunately it is not possible to transfer your store at this time. We are working on a method to do this though, so contact us if you are interested.
- Now you need to go through each of your servers using the server switcher (the server icon in the top right of Server Manager) and set up their settings correctly. Note that each server will need its own ports for TCP Port, UDP Port, HTTP Port and Content Manager Wrapper Port in the Server Options. Be sure to set the server name too, so you can easily identify which server is which!
- You can move across old results files by copying the folder over to
servers/SERVER_00/assetto/results/and import championships/race weekends by exporting them from the old install and importing to the new through the Server Manager UI.